 Pin It
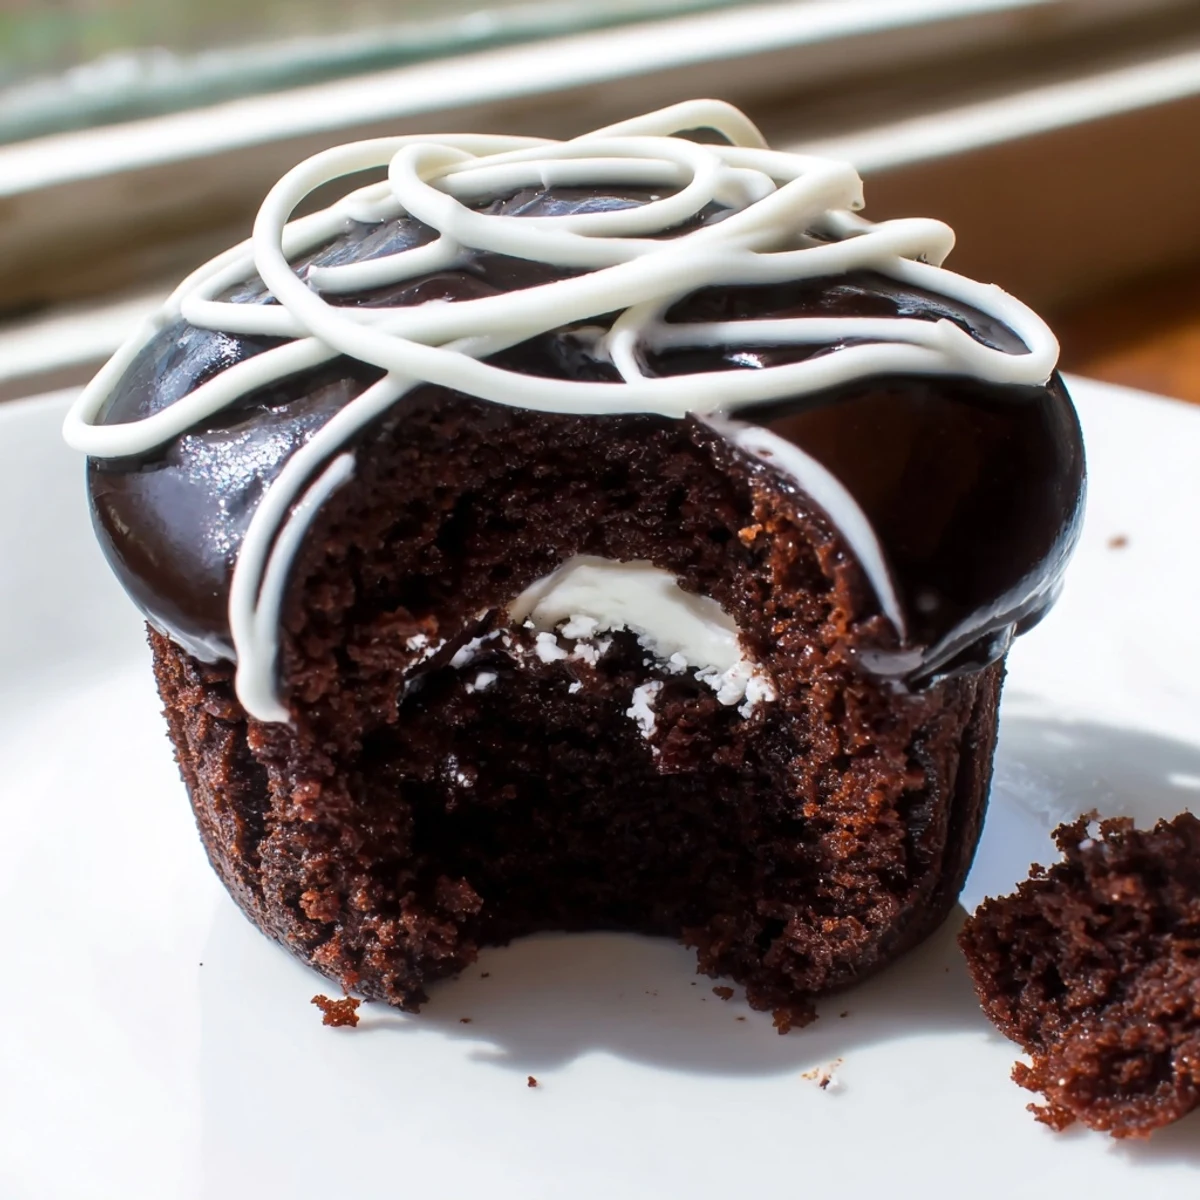
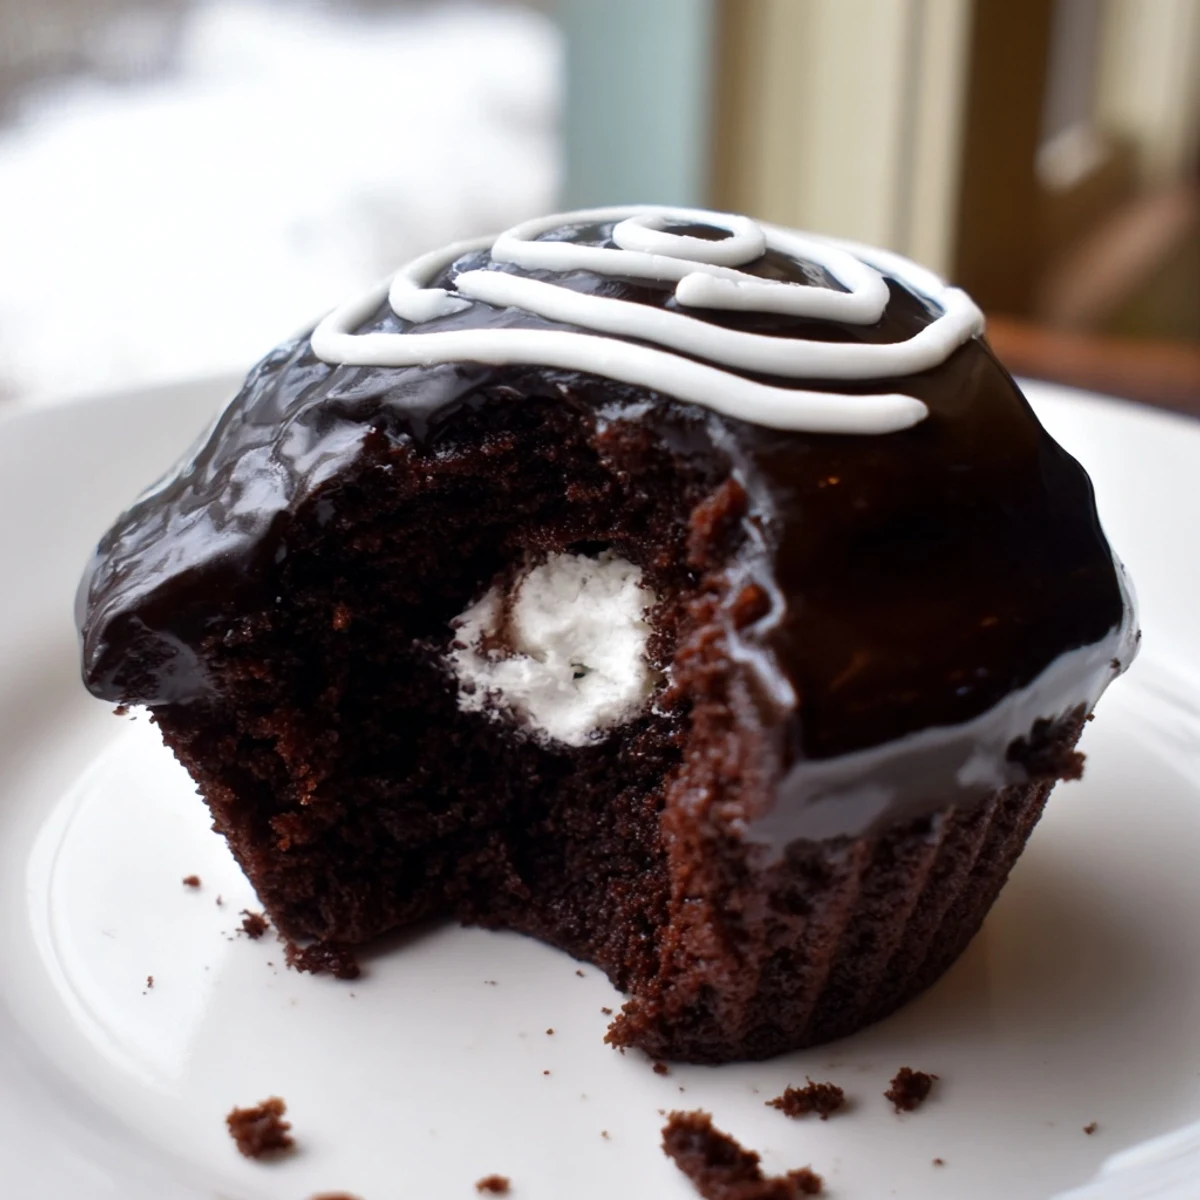
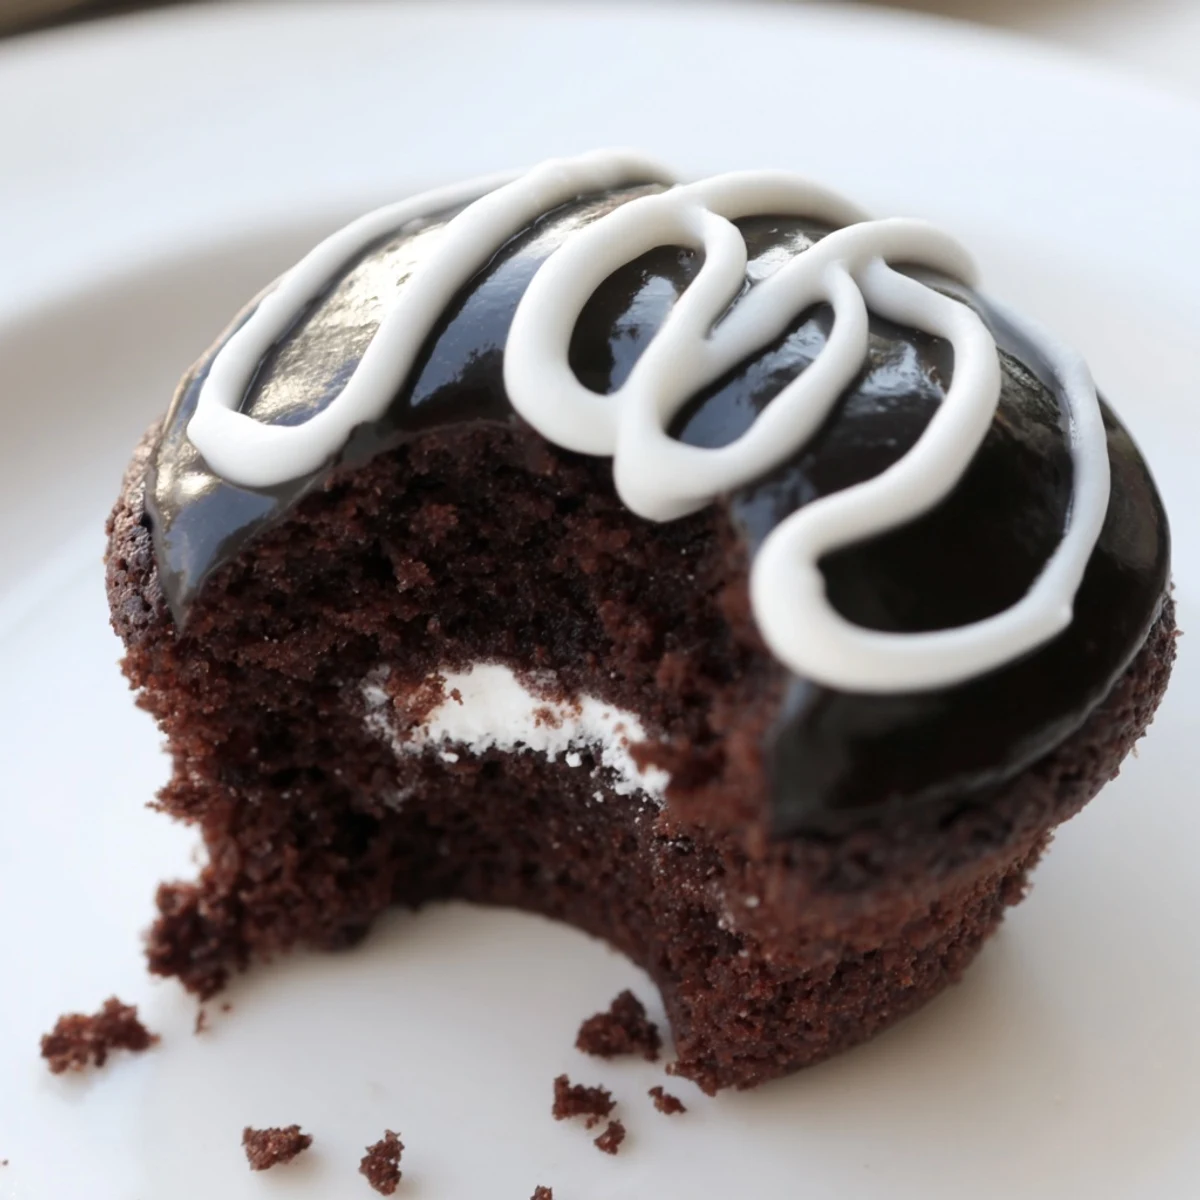
 These homemade Hostess-style cupcakes bring back childhood memories with every bite. Soft chocolate cake is hollowed and filled with a fluffy marshmallow-creme center, then dunked in a silky chocolate ganache.
A classic white icing swirl on top completes the nostalgic look. Perfect for birthday parties, bake sales, or anytime you crave that familiar combination of chocolate cake and creamy filling.
While they take a bit of patience with cooling and assembly, each step is straightforward and the results are well worth the effort.
The grocery store by my childhood house always kept Hostess CupCakes right at eye level near checkout, and my mother had a strict one treat per trip rule I stretched every possible way. Something about that squiggle of white icing over glossy chocolate held absolute power over me as a kid. Years later I found myself staring at an empty box in the pantry trash, two hours after a grocery run, and decided it was finally time to learn how to build them from scratch.
I brought a batch of these to a friends barbecue last summer and watched three grown adults freeze mid conversation after their first bite, then immediately reach for seconds. One friend quietly asked if I could make them for his birthday instead of a cake, which remains one of the highest compliments my kitchen has ever received.
Ingredients
- All purpose flour (1 cup, 120g): Provides the sturdy but tender crumb these cupcakes need to hold up against the rich filling and ganache.
- Unsweetened cocoa powder (half cup, 45g): Dutch processed gives you a deeper, smoother chocolate flavor, but natural works fine if that is what you have.
- Granulated sugar (1 cup, 200g): Balances the cocoa bitterness and creates a soft texture in the crumb.
- Baking soda and baking powder (half teaspoon and 1 teaspoon): The dual leavening gives the cupcakes a gentle, even rise without doming too much, which matters when you want flat tops for the ganache.
- Salt (quarter teaspoon): A small amount sharpens every flavor in the cake and keeps it from tasting flat.
- Buttermilk (half cup, 120ml, room temperature): Adds tang and tenderness, and the acid reacts with the baking soda for lift. Always let it come to room temperature so the batter emulsifies properly.
- Vegetable oil (half cup, 120ml): Oil keeps these cupcakes moist for days, unlike butter which can firm up in the fridge.
- Large eggs (2, room temperature): Room temperature eggs blend more evenly into the batter and help with rise.
- Vanilla extract (2 teaspoons for the cake, 1 teaspoon for the filling): Use the real stuff here, you will notice the difference in the filling especially.
- Hot water (half cup, 120ml): Blooms the cocoa powder and thins the batter, which sounds wrong but produces the most tender crumb.
- Unsalted butter for filling (third cup, 75g, softened): The base of the creamy center, so make sure it is truly soft but not melted.
- Powdered sugar for filling and icing (three quarter cup plus quarter cup): Dissolves seamlessly into the butter and the swirl icing without any graininess.
- Marshmallow creme (1 cup, 220g): This is the secret to that nostalgic, stretchy, sweet filling that tastes like childhood.
- Milk (1 to 2 teaspoons for filling, plus 1 teaspoon for icing): Just enough to reach the right piping consistency in both the filling and the squiggle.
- Semi sweet chocolate chips (half cup, 85g): The ganache depends entirely on decent chocolate, so use something you would happily eat by the handful.
- Heavy cream (quarter cup, 60ml): Creates that silky, pourable ganache that sets into a beautiful shell.
Instructions
- Get your oven ready:
- Preheat to 350 degrees F and line a standard 12 cup muffin tin with paper liners. This is also a good moment to take a breath and clear your counter because you are about to juggle a few components.
- Build the dry mix:
- Whisk together the flour, cocoa powder, sugar, baking soda, baking powder, and salt in a large bowl until evenly blended and no lumps remain.
- Add the wet ingredients:
- Pour in the buttermilk, oil, eggs, and vanilla, then mix gently until just combined. The batter will look thick at this stage and that is perfectly fine.
- Thin it with hot water:
- Slowly stir in the hot water until the batter turns smooth and quite runny. It should pour easily off your whisk, so do not panic at how liquid it seems.
- Fill and bake:
- Divide the batter evenly among the liners, filling each about two thirds full. Bake 18 to 20 minutes until a toothpick inserted in the center comes out clean, then transfer to a wire rack to cool completely.
- Whip up the filling:
- Beat the softened butter until light and creamy, then add the powdered sugar and beat for one minute. Fold in the marshmallow creme and vanilla, beating until cloud like and fluffy, and add a teaspoon of milk if it feels too stiff to pipe.
- Core and fill the cupcakes:
- Use a small knife or cupcake corer to cut a shallow hole in the center of each cooled cupcake, saving the little tops. Pipe the filling generously into each cavity and gently press the tops back on if you kept them.
- Make the ganache:
- Heat the heavy cream in a small saucepan until it is steaming but not bubbling, pour it over the chocolate chips, and let it sit undisturbed for two minutes before stirring into a glossy, silky pool.
- Coat the tops:
- Spoon the ganache over each cupcake or dip them upside down, using the back of a spoon to smooth it evenly. Let them sit until the chocolate sets into a firm shell.
- Pipe the classic squiggle:
- Mix the powdered sugar with just enough milk to form a thick but pipeable icing, transfer it to a piping bag or zip top bag with a tiny corner snipped off, and draw the iconic white swirl across each cupcake top.
 Pin It
 The night I finally nailed the squiggle design I sent a photo to my mother with no context, and she responded asking when I had started buying Hostess at the store again. That small white lie of homemade perfection felt like a victory worth savoring.
Getting Ahead and Storing Them
You can bake the cupcakes a day in advance and store them unfilled and unglazed in an airtight container at room temperature. Once assembled, these keep well in the refrigerator for up to three days, but always let them sit out for about twenty minutes before serving so the filling softens back up. The ganache actually firms up beautifully in the fridge and gives you that satisfying crack when you bite in.
Playing With Flavors
The filling is remarkably forgiving and loves to be tinkered with. A quarter teaspoon of almond extract in place of the vanilla turns the center into something that tastes like a fancy bakery case item. Coconut extract is another route worth exploring, especially if you swap the semi sweet chips for dark chocolate on top.
Tools That Actually Help
A cupcake corer is one of those unitaskers that sounds silly until you use it once and wonder how you lived without it. A simple zip top bag with the corner snipped works perfectly well for both the filling and the white squiggle, so do not feel pressured to buy piping bags and tips.
- Slide a piece of parchment under your wire rack before glazing so the ganache drips have somewhere to go instead of pooling on your counter.
- Chill the filled cupcakes for fifteen minutes before dipping in ganache to help the chocolate set faster and more evenly.
- If your white icing is too thin add powdered sugar a teaspoon at a time rather than reaching for more milk.
 Pin It
 These cupcakes are a little project and a lot of joy, and every messy, chocolate smeared minute in the kitchen is worth it when someone peels back the liner and takes that first bite.
Recipe FAQ
- → Can I make the cupcakes ahead of time?
-
Yes, you can bake the cupcakes a day in advance and store them in an airtight container at room temperature. Fill and glaze them the next day for the freshest results.
- → What can I use instead of marshmallow creme for the filling?
-
You can substitute marshmallow creme with an equal amount of Swiss meringue buttercream or a simple buttercream made with additional powdered sugar and a splash of vanilla extract for a similar fluffy texture.
- → How do I get a clean swirl on top of the ganache?
-
Make sure the ganache is fully set before piping the white icing. Use a piping bag with a fine round tip or a zip-top bag with a tiny corner snipped off. Pipe in a single continuous motion, looping back and forth across the cupcake top.
- → Why is my cupcake batter so thin?
-
A thin batter is completely normal for this style of chocolate cupcake. The hot water helps bloom the cocoa powder for deeper flavor and creates a tender, moist crumb. The batter will bake up perfectly in the oven.
- → Can I freeze these filled and glazed cupcakes?
-
You can freeze them after filling and glazing for up to one month. Place them in a single layer in an airtight container. Thaw in the refrigerator overnight and let them come to room temperature before serving for the best texture.
- → How do I core the cupcakes without a special tool?
-
Use a small paring knife or even an apple corer to carefully remove a small cone-shaped piece from the center of each cooled cupcake. A melon baller also works well for scooping out just enough cake to hold the filling.